


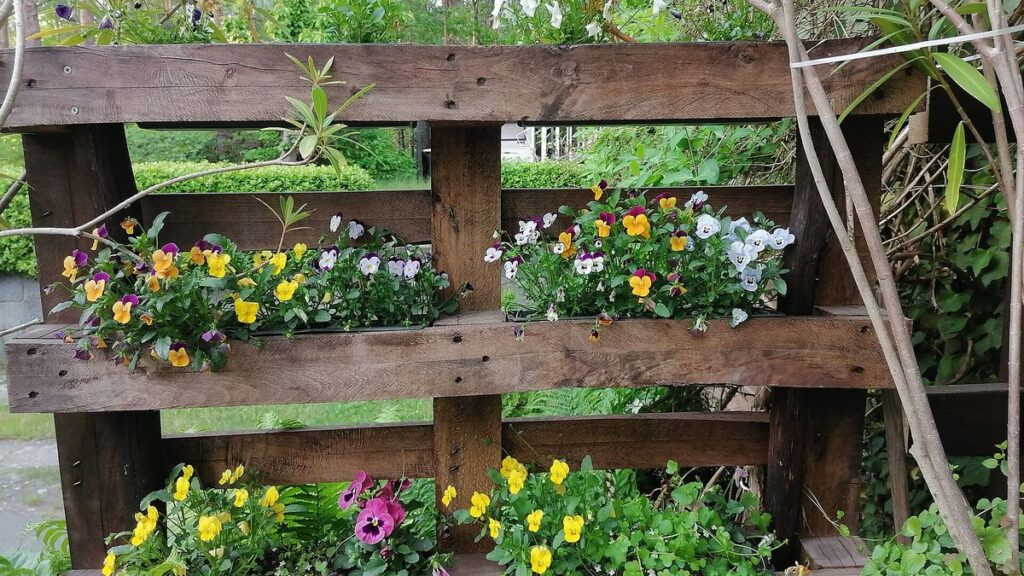
A wooden pallet is one of the easiest things to find for free, and one of the most rewarding to upcycle. With a few hours of work, a pallet that would end up in a landfill becomes a vertical planter that holds herbs, succulents or trailing flowers against a fence, a balcony wall or a sunny corner of the patio.
In this guide you will learn how to choose a pallet that is safe to bring home, which tools and materials you actually need, how to build the planter step by step, and how to keep it looking good for several seasons. At the end there is a short checklist you can keep on your phone for the next project.
Start with the right pallet
Not every pallet is a good candidate. Before you load one into the car, take a minute to inspect it.
Read the stamp
Many pallets used in international shipping carry a stamp from ISPM 15, the wood packaging standard published by the International Plant Protection Convention. The stamp shows how the wood was treated against pests. Two codes are the most common:
- HT means heat treated. This is the one you want for a planter.
- MB means the wood was fumigated with methyl bromide, a chemical treatment. Skip these pallets for anything that will hold soil or edible plants.
If a pallet has no stamp at all, it may be a domestic pallet that was never treated, but you cannot be sure what it carried. Use unmarked pallets for decorative flowers rather than herbs or vegetables, or pass on them entirely.
Check what it carried and how it looks
- Avoid pallets with dark stains, oily spots or a chemical smell. You do not know what leaked on them.
- Avoid painted pallets (often blue, red or brown) that belong to pallet rental companies; they are not meant to be kept and the paint may contain unknown additives.
- Look for solid boards with few cracks, no soft or rotten spots and no mold.
- Ask the store or warehouse before taking a pallet. Many businesses are happy to give away damaged ones, but some are returnable property.
Tools and materials
You do not need a full workshop for this project. Here is a realistic list:
- One pallet in good condition
- Work gloves and safety glasses
- A dust mask for sanding
- A pry bar or a flat bar, plus a hammer
- A random orbit sander or a sanding block with 80 and 120 grit paper
- A drill with screws for exterior use (about 1 1/4 inch)
- Heavy-duty landscape fabric
- A staple gun with rust-resistant staples
- Exterior-grade wood sealer or a natural oil finish (optional)
- Potting mix and plants suited to your light conditions
If you plan to grow edible herbs, choose a finish labeled as safe once cured for outdoor planters, or leave the inside of the boxes unfinished and seal only the outer faces.
Step-by-step: building the planter
There are two common designs. The simplest keeps the pallet whole and turns the gaps between the slats into planting pockets. The second takes the pallet apart and rebuilds deeper boxes. The steps below cover the first design, which suits beginners and takes an afternoon.
1. Clean and inspect
Brush off dirt and loose splinters, then wash the pallet with water and mild soap. Let it dry completely in the sun for a day or two. Wet wood clogs sandpaper and will not take a finish evenly.
2. Remove loose nails and sand
Pull or hammer flat any nails that stick out. Sand the front face and the edges with 80 grit to remove rough spots, then go over the surfaces your hands will touch with 120 grit. You do not need a furniture-smooth surface; you just want no splinters.
3. Decide which side faces up
Stand the pallet on its end. The side with three wide boards on the back (the bottom deck when it was lying flat) usually becomes the back of the planter. The open gaps on the front will become the planting rows.
4. Close the bottom of each row
Each row needs a floor. Cut a board from a second pallet, or use the extra slats from the back, to fit snugly between the side runners under each front slat. Screw it in from the sides. This creates a trough behind each front board.
5. Line the troughs with landscape fabric
Cut fabric strips about twice as wide as each trough. Fold them in so they line the bottom and the back, and staple them along the top edges. Landscape fabric holds the soil while letting water drain, which prevents roots from rotting.
6. Seal the outside (optional)
If you want the wood to keep its warm color longer, apply an exterior sealer or oil to the front, sides and back, following the label for drying time. Many outdoor finishes need at least 24 hours before they meet soil, so plan for that.
7. Fill and plant
Move the planter to its final spot before filling it, because soil adds a lot of weight. Lay it flat on the ground, fill each trough with potting mix, plant from the bottom row up and water gently. Leave it flat for one to two weeks so the roots can grip the soil, then tilt it upright against the wall or fence.
Mounting it safely
A pallet planter full of damp soil is heavy, so treat it like a piece of furniture that could tip over.
- Lean it against a solid surface rather than leaving it free-standing.
- Secure the top to the wall or fence with two heavy-duty L brackets or a short length of chain fixed to eye screws.
- On a balcony, check the building rules and the weight limits before adding a large planter. A smaller half-pallet version is often the better choice there.
- Keep it away from walkways where kids or pets could pull on it.
Choosing plants that thrive in a pallet
Because each trough holds only a few inches of soil, the plants dry out faster than in the ground. Shallow-rooted plants do best:
- Sunny spots: thyme, oregano, chives, small lettuce varieties, strawberries, petunias and succulents such as sedum.
- Partial shade: mint (it spreads, so it is happy in its own row), parsley, ferns, begonias and trailing ivy.
- Avoid: deep-rooted vegetables such as tomatoes or carrots and anything that grows large and top-heavy.
Group plants with similar water needs in the same row. Put the thirstiest ones in the bottom rows, since water drains downward.
Care and maintenance
- Watering: check the soil with your finger every day or two in warm weather. Water slowly from the top row so the moisture works its way down.
- Feeding: the small volume of soil runs out of nutrients quickly. A slow-release fertilizer at planting time, plus a refresh mid-season, keeps plants growing.
- Wood care: once a year, lightly sand any grey or rough areas on the outside and add a fresh coat of oil or sealer.
- Winter: in cold climates, move the planter to a sheltered spot or empty it, so freezing soil does not split the boards.
Common mistakes to avoid
- Taking the first free pallet without checking the stamp or the smell.
- Skipping the landscape fabric, which leads to soil washing out of every gap.
- Standing the planter up the same day it was planted, before roots hold the soil.
- Using indoor screws that rust and stain the wood within a season.
- Overcrowding the rows; plants need room to breathe and grow.
Quick summary and checklist
A pallet vertical planter is a cheap, satisfying upcycling project that turns waste wood into a living wall. The secret is choosing a clean, heat-treated pallet, giving each row a solid floor lined with fabric, letting the plants root before standing it up and anchoring it to a solid surface.
- Pallet stamped HT, clean, no stains or odors
- Washed, dried and sanded front and edges
- Floors added under each front slat
- Rows lined with landscape fabric
- Optional exterior finish, fully cured
- Planted flat, rested one to two weeks
- Secured to a wall or fence with brackets or chain
Follow these steps and your planter should look good and stay sturdy for several seasons, with little more than regular watering and a yearly touch-up of the wood.
Photo: Ruhland, Grenzstr. 3, mit Hornveilchen bepflanzte Transportpalette, Spätfrühling, 03, by Wilhelm Zimmerling PAR, license CC BY-SA 4.0, via Wikimedia Commons. Cropped.