


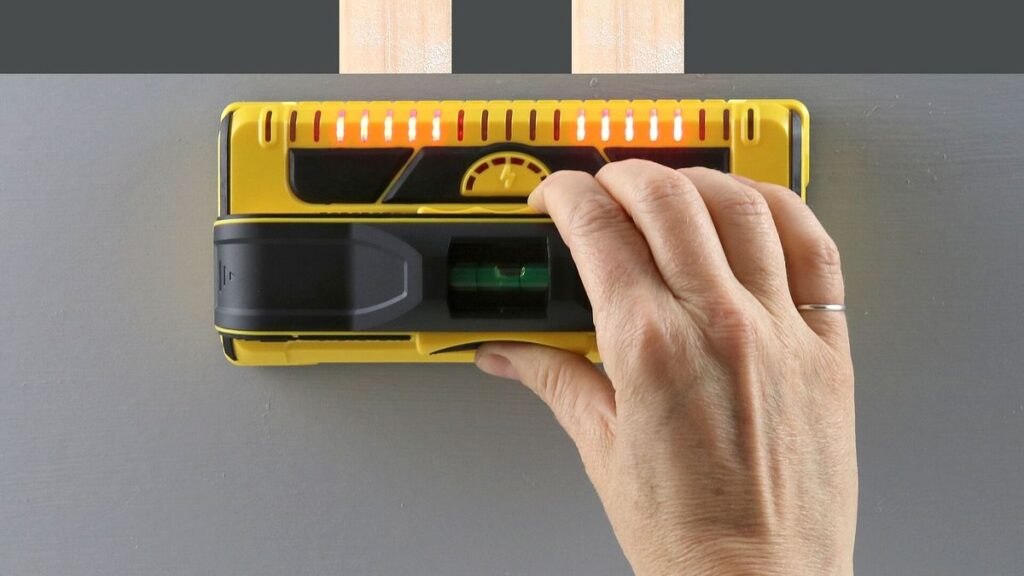
Hanging a heavy mirror, mounting a TV or putting up kitchen shelves all start with the same question: where are the studs? Drywall alone cannot hold much weight, so anything heavy needs to go into the wooden or metal framing behind it. A stud finder makes that job faster, but only if you know how to use it properly. Many people try one, get confusing beeps, and go back to guessing.
This guide explains how the main types of stud finders work, how to calibrate and scan correctly, how to confirm what the tool tells you, and what mistakes lead to holes in the wrong place. You will also learn a few low-tech backup methods for when the tool is not cooperating.
How stud finders work
Knowing what the tool is actually detecting helps you read its signals. There are three main types.
Magnetic stud finders
These are the simplest. A strong magnet inside the body is attracted to the screws or nails that hold drywall to the studs. When you slide it across the wall, it sticks or pulls toward a fastener. Since fasteners are driven into studs, a line of them shows you where a stud runs.
- Pros: cheap, no batteries, very reliable at finding fasteners.
- Cons: slow, because you have to search for small points, and it only tells you where a screw is, not the edges of the stud.
Electronic (capacitive) stud finders
Most battery-powered stud finders measure changes in density behind the surface. Drywall over an empty cavity reads one way; drywall over a solid stud reads differently. The tool lights up or beeps when it senses the change.
- Pros: fast, and many models show the edges or center of the stud.
- Cons: sensitive to how you hold and calibrate them, and they can be confused by pipes, wiring, thick plaster or uneven walls.
Multi-scanners
Higher-end models combine stud detection with modes for metal and live AC wiring, and some show the reading on a screen. They are useful, but they still rely on the same principles, so the technique below applies to them too.
Before you scan: prepare the wall and the tool
A little preparation saves a lot of frustration.
- Fresh batteries. Weak batteries are one of the most common reasons an electronic finder gives erratic readings.
- Read the manual once. Each model has its own lights, sounds and modes. A quick look at what each signal means prevents misreading the tool later.
- Clear the area. Take down pictures and move furniture so you can scan a wide stretch of wall without interruptions.
- Pick the right mode. Some tools have a deeper scanning mode for thicker walls. Start with the standard mode and switch only if you get no readings.
- Know your wall. Modern drywall is usually easy to scan. Old lath-and-plaster walls, tile and paneling are harder, and the tool may need a different approach.
How to scan correctly
Technique is where most problems happen. Follow these steps with an electronic stud finder.
Calibrate on an empty spot
Most electronic finders calibrate when you press and hold the button against the wall. They treat that first spot as “empty wall.” If you start right on top of a stud, the tool learns the wrong baseline and may never signal correctly. Start a hand-width or two away from where you think a stud might be, hold the button, wait for the ready signal, then begin moving.
Move slowly and keep it flat
Slide the tool horizontally at a slow, steady pace while keeping it flat against the wall. Do not lift it, tilt it or let go of the button in the middle of a pass. If you do, recalibrate and start again.
Mark both edges
When the tool signals, make a light pencil mark. Keep sliding until the signal stops and mark that point too. Then scan back from the other direction and mark where the signal starts. The stud usually sits between the outer marks, and its center is roughly in the middle. Marking both edges is far more reliable than trusting a single beep.
Confirm with a second and third reading
Repeat the scan a few inches higher and lower on the wall. Studs run vertically, so your marks should line up in a straight vertical line. If one mark is off to the side, it may be a pipe, a cable or a block of wood rather than a stud.
Confirm before you drill
A stud finder gives you a strong hint, not a guarantee. Before you drive a large screw or anchor, confirm what is behind the wall.
- Look for a pattern. In many houses, studs are spaced at a regular interval. Once you find two or three, the spacing helps you predict and check the others. Spacing can vary, especially around doors, windows and corners, so treat it as a guide.
- Use a magnet as a check. Slide a small magnet along your vertical line. If it finds screws or nails along that line, you are almost certainly on a stud.
- Test with a small nail. Tap a thin finishing nail into the wall at your mark, in a spot that will be covered by whatever you are hanging. If it hits solid wood, you are on the stud. If it slides through easily, move over and try again. Small nail holes are easy to fill later.
- Check corners and outlets. Electrical boxes are usually attached to the side of a stud, and there is normally framing at wall corners, which can help confirm your measurements.
Safety: wires and pipes
The same space that holds studs also holds electrical cables and plumbing. Drilling into either can be dangerous and expensive.
Be extra careful directly above and below outlets and switches, because cables often run vertically from them, and on walls behind sinks, toilets and appliances where pipes are likely. If your tool has a live-wire detection mode, use it, but do not rely on it alone; it may not detect wires that are shielded, deep in the wall or not carrying current. If you are unsure, switch off the circuit at the breaker before drilling, use a short drill bit or a drill stop, and drill only as deep as you need. The U.S. Occupational Safety and Health Administration has a general overview of electrical hazards that is worth reading if you do a lot of work around wiring. When in doubt, ask a licensed electrician.
Common mistakes and how to fix them
If your stud finder seems unreliable, one of these is usually the cause:
- Calibrating over a stud. Move to a different spot and recalibrate.
- Moving too fast. Slow down; the sensor needs time to register the change.
- Pressing unevenly. Keep the whole sensor pad flat and steady on the wall.
- Scanning over textured or wet surfaces. Heavy texture and damp walls can confuse readings. Try a smoother spot or let fresh paint dry first.
- Trusting a single beep. Always mark both edges and confirm with a second pass.
- Ignoring the wall type. On plaster and lath, the lath itself can trigger constant readings. A magnetic finder or the small-nail test usually works better there.
- Mistaking pipes or ducts for studs. If the “stud” is wider than expected or does not run straight up and down, investigate before drilling.
Low-tech backup methods
If you do not have a stud finder, or it is giving nonsense readings, you still have options:
- Knock and listen. Tap the wall with your knuckles. A hollow sound usually means an empty cavity; a duller, more solid sound may mean a stud. This is a rough method, so confirm it.
- Look at the baseboard. Baseboards are often nailed into studs. Small filled nail holes can show you where they are.
- Use a flashlight at a low angle. Shine it along the wall. Sometimes you can see slight dimples where drywall screws were covered with filler.
- Measure from a known stud. Once you confirm one stud, measure across and test at the likely spacing.
Summary
- Magnetic finders locate fasteners; electronic finders detect density changes; multi-scanners add metal and wiring modes.
- Use fresh batteries, read the manual and clear the wall before you start.
- Calibrate on an empty spot, move slowly, keep the tool flat and mark both edges of each stud.
- Confirm with repeated scans, a magnet or a small test nail before drilling large holes.
- Be careful around outlets, switches and plumbing, and turn off power when in doubt.
- If the tool struggles, especially on plaster, combine it with the low-tech methods.
With a little practice, a stud finder becomes one of the most useful tools in your kit, and every shelf, mirror and bracket you hang will end up exactly where it should be: firmly anchored in solid framing.
Photo: M210 demo-wall double-stud, by KJGarcia, license CC BY-SA 4.0, via Wikimedia Commons. Cropped.